Vertigo Callouts
Vertigo is one of the newest additions to CS:GO's competitive Active Duty map pool. It is a demolition (bomb defusal) map set close to the top of a skyscraper that's still under construction. Unlike most other CS:GO maps, it's possible to fall off this map (and from such a height, there's no chance of surviving). Both A Site and B Site are located on the top floor of this map.

This map and the callouts are the same (or very similar) in both CS2 and CS:GO.

Callouts Table
Type the name of a callout from Vertigo to instantly search our database of all 41 callouts from this map.
| Callout | Description |
|---|---|
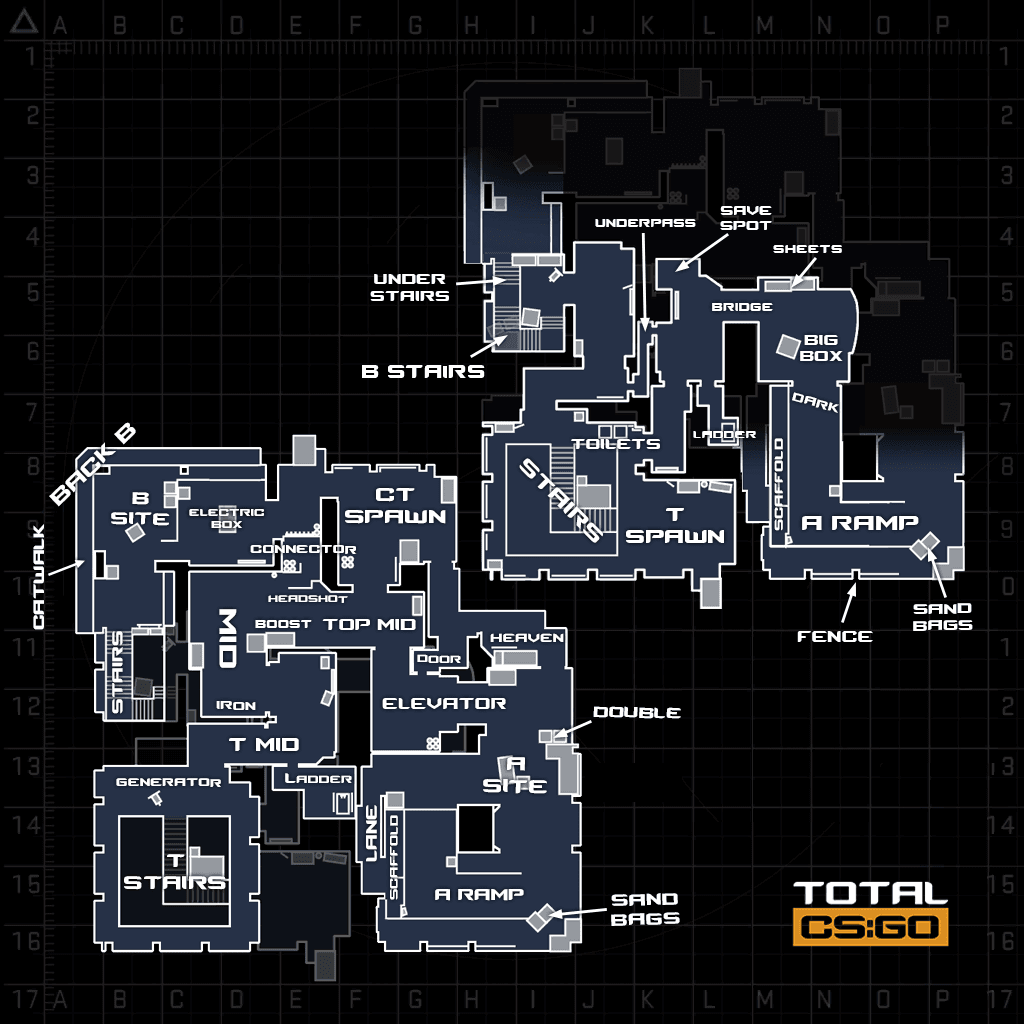
Under Stairs | The area under B Stairs, which can be used to view the underside of Catwalk. |
B Stairs | The stairs which connect T Spawn to B Site. It is the one of the main entrances for Ts to use when taking the B Site. |
Underpass | This is the narrow corridor which connects Bridge Towards B Stairs. It's a useful route for Ts rotating from one bombsite entrance to the other. |
Save Spot | Save Spot is the corner placed between Bridge and Underpass. It earned its name through being a common spot for players to save their weapons on rounds they're unlikely to win. |
Big Box | As the name suggests, Big Box is the large wooden crate placed between A Ramp and Bridge. It can be useful for Ts to use as cover when checking A Ramp for CTs. |
Bridge | This is the path connecting the area next to Save Spot to A Ramp. Players can also strategically throw weapons off of Bridge to prevent enemies from obtaining them. |
Sheets | The small cubby next to A Ramp containg sheets of building material. |
Ladder | This is the ladder which gives players access to T Mid from near Underpass. It is one of the quickest ways to change floors on the map. |
Toilets | The pair of toilets which are placed in T Spawn. They are an interactive element, which can be used to hide players and weapons from enemies. |
T Spawn | The area of the map where the Terrorist side spawns. It features Stairs, Toilets, and a quick route towards Bridge. |
Dark | The small region between A Ramp and Big Box which has lower light levels. |
Scaffold | Scaffold connects to Lane, and is one of the routes Ts can take when entering A Site from Bridge. |
A Ramp | A Ramp is the large, open slope, offering access to A Site for Ts pushing from Bridge. It is often used by Ts to rush on eco/pistol rounds. |
Fence | Fence is the raised area next to Ramp and opposite to A Site. It can be used by CTs to get a quick view of Dark and spot any potential A Site pushes early on. |
Sand Bags | This is the pair of crates of sandbags, placed on the corner between Fence and A Site. If hidden well, CTs can use this spot to ambush Ts if they're pushing A Ramp. |
Stairs | This is the set of stairs placed in T Spawn, giving Ts access to Generator and to the second level of the map. |
Back B | Back B is the corner of B Site which connects to Catwalk. It has a tall metal post, which can be used as cover by players defending B Site. |
Catwalk | Catwalk is the platform which extends out from the main building, and connects to Back B and B Stairs. However, players can be shot from below if there's an enemy playing from Under Stairs. |
B Site | B Site is the region between Electric Box, Catwalk and Back B. It is the area where the bomb can be planted on B. |
Stairs | This is the set of stairs placed in T Spawn, giving Ts access to Generator and to the second level of the map. |
Electric Box | This is the large, rectangular box placed between CT Spawn and B Site. It is a useful spot for cover when retaking B Site. |
Connector | This spot gets its named by connecting Mid towards B Site and CT Spawn. Its raised platform allows players to get a useful view towards B Site. |
CT Spawn | The area of the map where the Counter-Terrorist side spawns. It gives CTs quick access to Top Mid, Electric Box, as well as Heaven. |
Headshot | Headshot is the small area between Top Mid and Connector. The name comes from the fact when peeking from this angle, only the player's head will be visible. |
Boost | Boost is the set of crates and palletes towards T Mid on Mid. Ts can boost teammates up to this spot to get a better view of Mid. |
Mid | This is the large, Middle area of the map. It gives access to CT Spawn, B Site through Connector, as well as A Site through Elevator. |
Iron | Iron is the collection of metal rods placed between Mid and T Mid. |
T Mid | This is the area of Mid placed closest to T Spawn. It is the route Ts will typically use when taking Mid. |
Generator | A part of the rasied region in T Spawn, giving Ts access to T Mid. |
T Stairs | These are the stairs Ts will use when they're looking to access T Mid. |
Ladder | This is the ladder which gives players access to T Mid from near Underpass. It is one of the quickest ways to change floors on the map. |
Lane | The narrow pathway which connects Scaffold to A Short. |
Scaffold | Scaffold connects to Lane, and is one of the routes Ts can take when entering A Site from Bridge. |
A Ramp | A Ramp is the large, open slope, offering access to A Site for Ts pushing from Bridge. It is often used by Ts to rush on eco/pistol rounds. |
Sand Bags | This is the pair of crates of sandbags, placed on the corner between Fence and A Site. If hidden well, CTs can use this spot to ambush Ts if they're pushing A Ramp. |
Double | Double is the set of orange crates placed next to A Site. It can be used as a headglitch position for CTs holding A Short. |
A Site | A Site is the entire region between A Short, A Ramp, and Double. This is the area where the bomb can be planted on A. |
Elevator | This is the space that connects A Site to Top Mid and Door. |
Door | Door is the narrow space that connects Elevator to CT Spawn and Heaven. |
Heaven | Acting as the connecting space between A Site and CT Spawn, Heaven has both a raised platform and doorway for CTs to use when defending A Site. |
Top Mid | This is the portion of mid which is closest to CT Spawn. This is the area CTs will typically use to prevent Ts from pushing Connector and Elevator. |