Whether it’s to settle an argument, boost your ego by crushing your friend or to test each other’s aim, it’s always useful to know the commands you need to set up a 1v1 match in CS2. This guide takes you through setting up a 1v1 match step-by-step: starting with the config file and commands, then finding a map, and finally launching the 1v1.
1. The Config File With 1v1 Commands
The list of commands that provide an optimal setup for a 1v1 server are too long to put into your console, so you have to use a config file. We have one for you to download below, as well as instructions for how to add it to your game.
Download the config file for 1v1 commands by clicking the button below (save the file in a place you can remember, as you'll need to move it, which is explained in the next section):
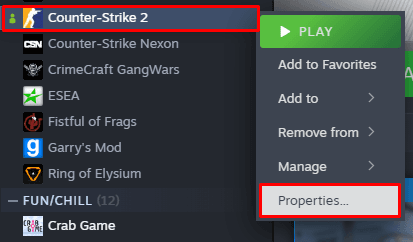
Now that you’ve got the config file saved, you’ll need to move it into the correct folder in your CS2 files. To do this, open up Steam, go to your Library, right click Counter-Strike 2, and click Properties:
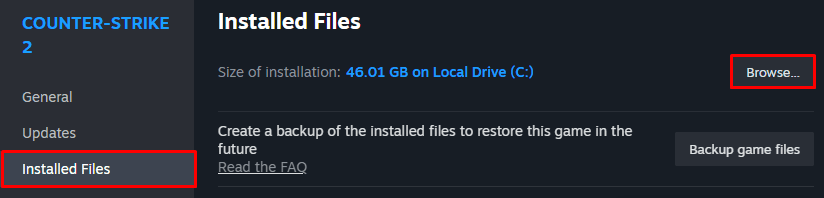
Then, on the newly opened window, click Installed Files, then click Browse...:
With your local CS2 files opened, go into the game folder, and then into the csgo folder. Next, you'll need to go into the cfg folder.
Move the 1v1_commands.cfg file you downloaded into the cfg folder.
We'll show you how to run this config in-game in section 3 (the final part of this guide).
2. Finding a 1v1 Map
If you already have a 1v1 map you want to play on, or you want to play on a default CS2 map (like Dust II) you can skip this section.
Now that you’ve got your config set up, you’ll need an arena to fight in.
It’s possible to use the default CS2 maps for this, but due to their large scale you’ll spend more time running around as you will fighting each other.
That’s why most people opt to play on a workshop map. These are maps created by the community, and there’s hundreds tailored to playing 1v1s in.
Head to this link for a list of the most popular 1v1 maps in CS2. When you’ve found one you like, click its image and click “Subscribe”.

After you've subscribed to the map(s) you want to 1v1 on, they will be downloaded the next time you open CS2. You can then access them in the “Workshop Maps” section when selecting what type of game mode to play.
3. Starting the 1v1
Congratulations, you've got everything in place to start up a private 1v1 match!
Now all you need to do is get in a lobby, invite your friends you want to play with, select the map you want to play on, start the game, and run the config file we downloaded in section 1.
Running the config file requires a console command. If you haven't already enabled the developer console, go to your CS2 Settings, click
Game, then selectYeson theEnable Developer Consoledropdown. If you're struggling to enable it, check out our enabling the developer console guide for more help. You can open the developer console after enabling it by pressing the`or~key on your keyboard.
With the developer console opened, type the following command into it and hit enter:
exec 1v1_commands_5f655200c0
We hope you found this 1v1 commands guide helpful - if something isn't working, or you need help, feel free to Tweet to us @Total_CSGO. You can also find more console commands which may make your 1v1s more interesting on our list of CS2 console commands.
If you have a suggestion for us, or if there's a problem with this article (e.g. it's outdated or not working for you), please let us know via one of the buttons below.